Saturday, March 19, 2011

Footboard Connected To My Chalkboard

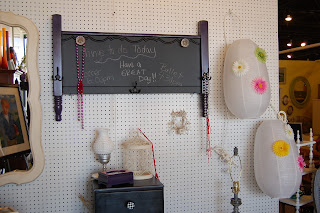
So, I found this leftover footboard at Goodwill...


It started out white.  Unfortunately, I forgot to take a picture while it was white.  Why purple?  I found a spare purple spray paint can in our basement.  I left the center white because I had an idea - why not make it into a chalkboard?  I applied the chalkboard paint with a roller.  You can also use spray can chalkboard paint.

Chalkboard Footboard
Tah, dah!  I added two hooks thinking this could be used as a coat rack message board.  It could be put in a kids room.  The hooks could be used for dressup clothes.  They could also be used for hats.  I hope this inspires you to do someting clever with a leftover piece.   

Thursday, March 17, 2011

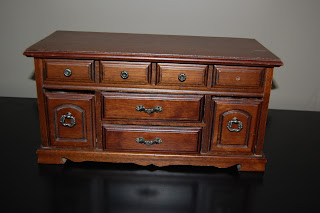
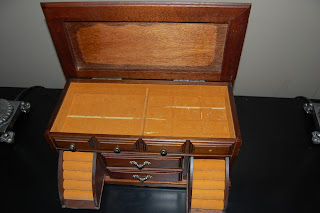
Jewelry Box


"hi"
When I was a little girl, I LOVED playing dressup.  I loved bracelets and necklaces.  When I see jewelry boxes like this at a Thrift Store - it puts be back down memory lane.  I just had to buy this box!  The recipe is below. 
***When I paint smaller projects, I use spray paint. 
I will always clarify spray paint versus Graco paint sprayer in the recipes we post.***


JEWELRY BOX RECIPE

Ingredients:  spray paint, masking tape, sand paper, fabric, scrap book paper, Mod Podge, drawer pulls

Steps:
  • Clean out the inside.  I used masking tape.  It does a great job of grabbing lint.
  • Prime!  Spray with Rust-Oleum White 2x Painter’s Touch Primer.  This will help keep the brown from bleeding through the light colors.  It dries quickly and was ready to paint first coat after 30 minutes.
  • Spray with Rust-Oleum Painter’s Touch Heirloom White in Satin.  Took three coats.  
  • Add fabric to the inside of the drawers.  First, cut fabric to fit.  Attach fabric in place with spray adhesive. 

Before fabric

Fabric after spray adhesive
  • Next, spread Mod Podge on top of the fabric.  This will help make the fabric stick and to give the material rigidity.  Repeat steps for all drawers.
  • The fun step – DECOUPAGE!!!  I found paisley scrapbooking paper that had a shabby chic look to it.  The top of the jewelry box was larger than my paper.  I cut a smaller sheet for the left side and the right side.  I used a full sheet and centered it on top of the smaller sheets. 
Note large piece of paper centered on top of two smaller pieces
  • I attached the paper with spray adhesive.  I then put on three coats of Mod Podge Satin and lightly sanded between coats.  I let the paper dry 30 minutes between coats. 
  • I had so much fun with the Mod Podge on top of the jewelry box that I put paper on the front of it. 
  • Sand the edges of the drawers to give the jewelry box character.  I sanded until I got the look I was wanting.
  • Reattach pulls.

So darn cute!

Here are the pictures again...

Before...
After

Lilac 1970's Dresser

Dressers are always fun to paint for kids! This recipe comes from a dresser painted by Becky. It is a 1970’s oak dresser. It is very solid and has bark-like grooves. Wowee!

This piece needs a major furniture intervention to make it work for a 3-year-old fairy and butterfly room.

Lilac Dresser

Before
LILAC DRESSER

Ingredients: sand paper, Graco cordless paint sprayer, primer, paint and crystal handles

Steps:
  1. Sand. This always helps the paint stick to the wood. It also helps to clean up the piece.
  2. Prime with with Zinsser Bullseye 1-2-3
  3. Paint with Valspar Lilac (2 coats). The Graco cordless paint sprayer was used to spray the paint.
  4. Sealed with spray polycrylic
  5. Add crystal handles


So, so pretty!
Here they are again...
Before and After


Now partying it up at :


Furniture Feature Fridays


High Back Chair Project

This is going to be our first blog "recipe".  When we find a project we think you may like, we'll create a recipe for it.  We'll give you our step by step directions.  We'll also give you tips, mistakes, and whatever else happens along the way.  Please feel free to give us your comments.


High Back Chairs

Add caption
Becky found these chairs.  They need something!  The recipe is below. 
One item to note - Becky paints her furniture with a Graco cordless paint sprayer. 
We'll post information about the sprayer another time. 

HIGH BACK CHAIR RECIPE 
  1. Spray with Kilz Primer (spray paint)
  2. Sand because Kilz leaves a rough texture – left it rough in some places as I liked the texture it gave to the wood.
  3. Spray with Sherwin Williams Steamed Milk
  4. Dry brush a combo of Valspar Mixing Glaze and Sherwin Williams Steely Gray/Aqua Sphere – just played with these three until I got the color I liked.  Dry brushing lets the base paint color show through so you can see the brush marks and the creamy color underneath. 
  5. Rub the edges for a distressed look.
  6. Cover the seat cushion in cream linen from Hancock Fabrics.
  7. Seal with spray polycrylic.
Tah, dah!  The "after" look.

Here they are again...

The "before" and "after"


Shop Thrift or Shop...

I enjoy thrifting.  My competitive juices start flowing when I'm in a thrift store.  I enjoy the hunt for a good deal.  Listed below are my thoughts on thrift.... 

CLOTHING
Easiest item to find at a thrift store.  The clothes at Goodwill are organized by color.  I appreciate the thought they put into the organization of their stores.  The number of name brands available is shocking and amazing.  To add - many are in perfect condition.  If you need, say a simple red shirt, consider going to a thrift store to find it.  You'll find it as a tshirt, tank, turtle neck, blouse, blazer, sweater, and so on.

GLASSWARE
If you are hosting guests and need a few extra glasses, don't go shopping for a new set!  Consider going to your nearest thrift store.  Glasses are easy to clean and they seldom shows wear.  Why not?  The same goes with silver serving trays, punch bowls, and vases. 

FURNITURE
If you like it, you must buy it or else someone will.  There are always headboards and end tables.  I've also found desks and hutches.  With a little creativity, furniture can be cleaned, sanded and painted to look brand new!  Most of the furniture posted on this site was purchased from a thrift store.

CHARITY
Many thrift stores are tied to a charity or non-profit organization.  Most notably, Goodwill provides job training, employment placement services and other community-based programs for people who have a disability, lack education or job experience, or face employment challenges.  Other service related thrift stores we visit are Bibles for Missions, Treasure Chest for Morning Star Mission, Salvation Army, and St Vincent De Paul Society. 

Think of all of the couches and hutches that would be piled in our landfills if it weren't for thrift stores!
Pay attention to prices.  Figure out what you think would be a good deal before you shop.  And just try it.  You may find a lot of great deals.
Saturday, March 12, 2011

Sassy Thrifty Headboards

Turqoise paint and knobs
The focal point of a bedroom is the bed.  I think the easiest way to "make" a kids bedroom is by making the headboard a statement. 

The twin headboards I've found at Target, Pottery Barn, etc. start at $100.  That times three kids means a lot of money to me! 

Enter a thrift store and you'll see a pile of headboards.  Typically they cost anywhere from $5 to $25.  With some creativity and a can of spray paint (approximately $4), you can create yourself a kicka$$ custom headboard!  Our creations...

Pretty in pink


Brown spray paint and knobs is all this headboard needed!
My favorite creation so far...Heirloom White with metal wings.
Let our creations be an inspiration to you!!!


Friday, March 11, 2011

Oh, crack!

I sanded.  I cleaned.  I painted.  Then it happened.  My paint crackled.  Oh, snap!
I'm convinced you can't predict and prevent paint from crackling. 
However, you can always fix them!
Step 1 - Sand the area all the way down to nothing.  Clean off dust completely.
During times like this, I find I'm a bit crabby.  I recommend sanding alone.
(FYI: paint drips can be fixed with the same steps)

Step 2 - Repaint area.  Try to avoid heavy coats.  Spray lightly.  Add a second light coat.  If you still see patched area, add a third coat.  Spray and blend paint with entire area of piece after the second coat.  


Tah, dah!  Can't tell where I patched.
Like the Dora the Explorer reflection from my daughter's pillow? Just keeping it real.  :)
Anyway...headboard turned out great!
I get the most crackle incidents with glass.
Once I sand, clean and repaint - crackle, snap and pop always go away.  
Be patient...sand and repaint!  The end result will make you happy.